


Route Webflow form submissions to HubSpot CRM with serverless functions, webhooks, or middleware platforms.
Connecting Webflow lead capture forms to HubSpot CRM enables automated contact creation, lifecycle stage management, and marketing workflow triggers without manual data entry. This integration creates a direct pipeline from visitor engagement to sales-ready leads.
This guide covers the architectural patterns, authentication requirements, and implementation approaches for syncing Webflow form submissions with HubSpot CRM at scale.
Integration architecture overview
The core challenge in Webflow-to-HubSpot integration is browser security. Direct client-side submissions from Webflow to HubSpot's authenticated API endpoints fail due to Cross-Origin Resource Sharing (CORS) restrictions. HubSpot's secure form submission endpoint does not support CORS, meaning browsers block these requests before they reach HubSpot's servers.
This technical limitation requires implementing a server-side intermediary architecture where form data is submitted from the browser to your own backend server, which then forwards the data to HubSpot's APIs, eliminating CORS issues through server-to-server communication.
Several architectural approaches address this constraint:
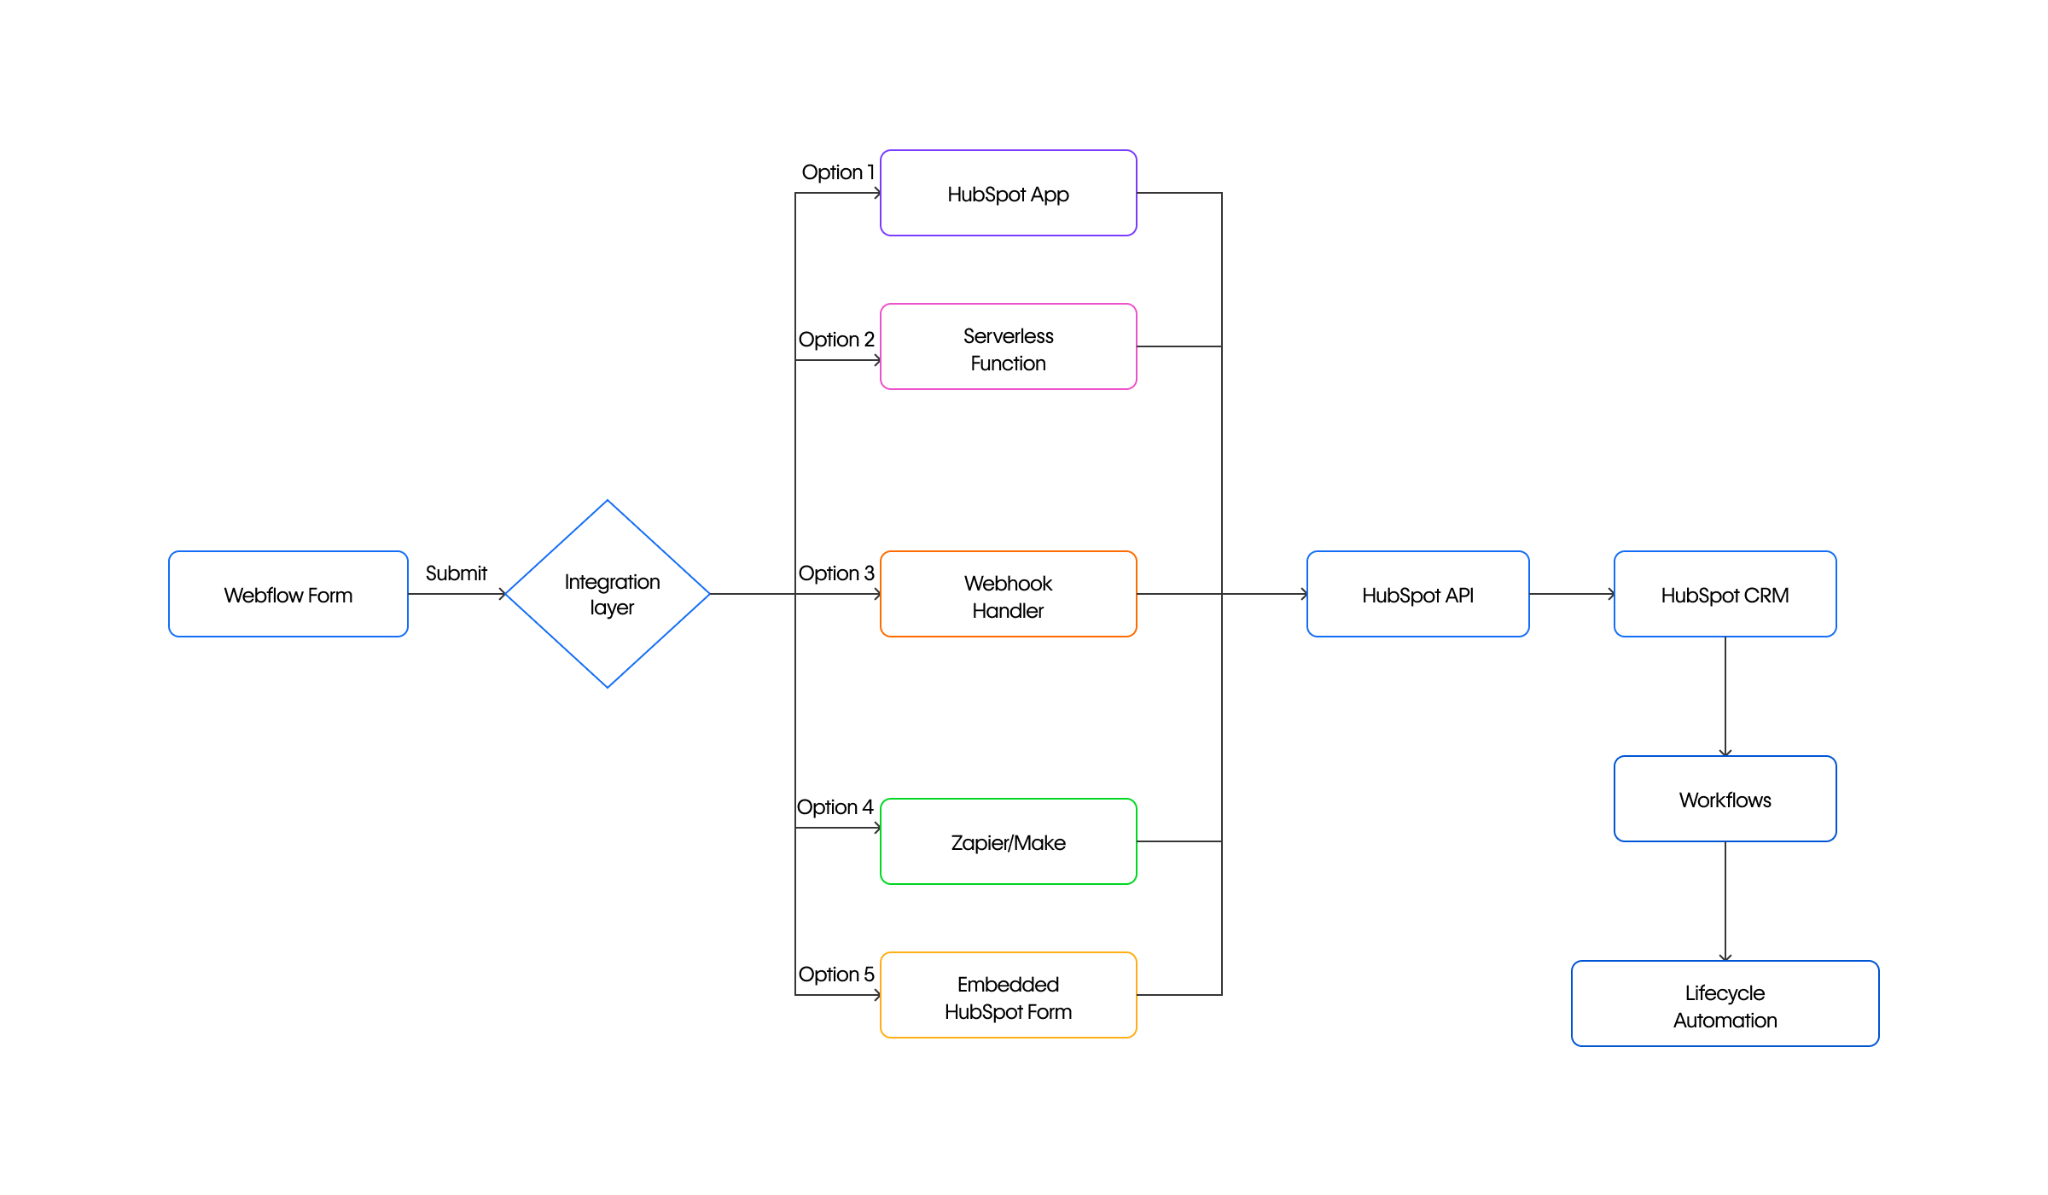
- The official HubSpot app on Webflow for zero-code setup with automatic form syncing and contact creation
- Serverless function intermediary for custom logic, data transformation, and multi-system integration with server-stored credentials and CORS control
- Webhook-based integration for decoupled form submission with custom retry logic and audit trails
- Middleware platforms (Zapier, Make) for no-code visual workflows and field mapping without infrastructure management
- Embedded HubSpot forms for built-in tracking, CAPTCHA support, and rapid deployment with limited design flexibility
The optimal approach depends on technical capability, customization requirements, cost structure preferences, and integration complexity.
Prerequisites and account setup
Successful integration requires API credentials from both platforms with properly configured OAuth scopes and a server-side execution environment.
At a high level, you'll need:
- A Webflow account with API access enabled
- A HubSpot account with forms and contacts access
- A server-side execution environment (serverless platform or webhook endpoint)
HubSpot authentication setup
HubSpot supports two primary authentication methods for CRM operations: private app tokens (legacy but functional for single-account integrations) and OAuth 2.0 (for multi-tenant applications). To create a private app, navigate to your HubSpot account settings > Development > Legacy apps > Create legacy app, then select "Private." Complete the Basic Info section and configure required scopes through the Scopes tab. After creating the app, generate your access token from the Auth tab. All HubSpot API requests require the Authorization header: Authorization: Bearer [YOUR_TOKEN]. Note that private apps are the recommended approach for single-account integrations, while OAuth 2.0 is required for multi-tenant SaaS applications and HubSpot App Marketplace listings.
Required OAuth scopes for form and contact operations:
Note: The authenticated Forms API endpoint (/submissions/v3/integration/secure/submit) uses your private app token for authentication. Verify current scope requirements in HubSpot's scopes documentation as these may change.
Store your access token securely as an environment variable. Tokens reflect configured scopes and automatically lose access to specific scopes if your HubSpot account is downgraded.
Webflow API credentials
Generate an API token in your Webflow account with sites:write and forms:read scopes using OAuth authentication. This token is required to authenticate API requests for creating webhooks through the Webflow API endpoint (POST https://api.webflow.com/v2/sites/{site_id}/webhooks) and retrieving form submission data via the Forms API.
Step 1: Choose your integration pattern
The right integration approach depends on your customization requirements, technical capacity, and volume expectations.
Pattern 1: Embedded HubSpot forms
Embedding HubSpot forms directly in Webflow provides the fastest path to integration with built-in tracking, CAPTCHA support, and automatic contact creation.
At a high level, you'll:
- Create a form in HubSpot's form editor
- Copy the embed code from the form's Share tab
- Paste the code into a Webflow Custom code embed element
This approach requires no custom code but limits design flexibility. Style forms through HubSpot's editor or apply custom CSS on your Webflow site.
Pattern 2: Native Webflow forms with API submission
Building forms in Webflow gives you complete design control while routing submissions to HubSpot through the Forms API v3.
HubSpot Forms API endpoint:
POST https://api.hsforms.com/submissions/v3/integration/secure/submit/{portalId}/{formGuid}Request payload structure:
{
  "fields": [
    { "objectTypeId": "0-1", "name": "email", "value": "[email protected]" },
    { "objectTypeId": "0-1", "name": "firstname", "value": "Jane" },
    { "objectTypeId": "0-1", "name": "lastname", "value": "Doe" }
  ],
  "context": {
    "hutk": "hubspotutk_cookie_value",
    "pageUri": "https://yoursite.webflow.io/contact",
    "pageName": "Contact Form"
  }
}
Retrieve the HubSpot tracking cookie (hubspotutk) from browser cookies for contact attribution. See HubSpot tracking code documentation.
Implement through a serverless function or webhook handler as described in the architecture section.
Pattern 3: Webhook-based integration
Webflow webhooks send POST requests with JSON payloads to your specified endpoint when form submissions occur. Because Webflow processes and stores the form submission independently of your webhook endpoint's availability, submissions are recorded even if your endpoint is temporarily unavailable and can be retrieved later via the Forms API.
Create a webhook via the Webflow API:
curl -X POST https://api.webflow.com/v2/sites/{site_id}/webhooks \
  -H "Authorization: Bearer {your_token}" \
  -H "Content-Type: application/json" \
  -d '{
    "triggerType": "form_submission",
    "url": "https://your-endpoint.com/webhook"
  }'
Webflow sends this payload structure:
{
  "triggerType": "form_submission",
  "payload": {
    "name": "Contact Form",
    "siteId": "65427cf400e02b306eaa049c",
    "data": {
      "First Name": "Jane",
      "Last Name": "Doe",
      "email": "[email protected]"
    },
    "submittedAt": "2024-01-15T12:35:16.117Z",
    "formId": "65429eadebe8a9f3a30f62d0"
  }
}
Your handler transforms this payload and forwards it to HubSpot's Contacts API or Forms API.
Step 2: Configure HubSpot contact properties
Map Webflow form fields to HubSpot contact properties for consistent data storage. HubSpot provides default properties for common fields, but custom properties handle form-specific data.
Default contact properties
Use these internal names when submitting data to HubSpot:
Create custom properties
For form fields without default mappings, create custom properties via the Properties API using the POST /crm/v3/properties/contacts endpoint.
{
  "groupName": "contactinformation",
  "name": "lead_source_form",
  "label": "Lead Source Form",
  "type": "string",
  "fieldType": "text"
}
Valid type and fieldType combinations:
Critical: Both type and fieldType are required when creating properties, and they must be compatible combinations.
When mapping Webflow form fields to HubSpot properties via API, use the internal name value in all API calls, not the display label.
Step 3: Implement webhook signature verification
Both platforms implement HMAC-based signature verification for webhooks. Webflow uses HMAC SHA256 with signatures in the x-webflow-signature header, while HubSpot uses HMAC SHA-256 with signatures in the X-HubSpot-Signature header.
Webflow signature verification:
const crypto = require('crypto');

function verifyWebflowSignature(secret, body, signature) {
  const hash = crypto.createHmac('sha256', secret)
    .update(body)
    .digest('hex');
  return hash === signature;
}

app.post('/webhook', (req, res) => {
  const signature = req.headers['x-webflow-signature'];
  if (verifyWebflowSignature(WEBFLOW_WEBHOOK_SECRET, req.rawBody, signature)) {
    console.log('Webhook verified:', req.body);
    res.status(200).send('OK');
  } else {
    res.status(401).send('Unauthorized');
  }
});
Note: Webhooks created through the Webflow dashboard may not include security verification headers. API-created webhooks include these headers for HMAC-based signature validation. Verify current behavior in Webflow's webhook documentation.
For HubSpot signature verification implementation, see HubSpot's request validation documentation.
Step 4: Set up lifecycle stage automation
HubSpot workflows automate lifecycle stage progression based on form submissions and contact engagement through event-based enrollment triggers. Configure enrollment triggers through the HubSpot Automation API v4 with form submission event types and property update actions.
Valid lifecycle stage values:
subscriberleadmarketingqualifiedleadsalesqualifiedleadopportunityevangelistcustomer
Update lifecycle stage via Contacts API:
{
  "properties": {
    "lifecyclestage": "marketingqualifiedlead"
  }
}
Use internal enumeration names (not display labels) in API requests. Reference HubSpot's workflow enrollment triggers documentation for form submission trigger configuration.
Step 5: Verify integration success
Test your integration end-to-end before production deployment.
Webflow form submission:
- Submit a test form on your Webflow site
- Verify the submission appears in Webflow's Forms dashboard
- Check webhook delivery logs if using webhook pattern
HubSpot contact creation:
Use POST /crm/v3/objects/contacts with required crm.objects.contacts.write scope. For batch operations (up to 100 contacts), use /crm/v3/objects/contacts/batch/create. See HubSpot Contacts API documentation.
- Search for the test contact in HubSpot CRM
- Verify all mapped properties contain expected values
- Confirm lifecycle stage assignment
Workflow enrollment:
- Check the contact's workflow history in HubSpot
- Verify enrollment trigger fired correctly
- Confirm subsequent workflow actions executed
Step 6: Handle rate limits at scale
Both platforms enforce rate limits that require careful architectural consideration for high-volume implementations. Webflow enforces a technical limit of 75 webhook registrations per trigger type per site.
HubSpot rate limits
HubSpot enforces rate limits on a per-10-second burst window basis. These limits apply across all API endpoints including the Forms API.
HubSpot returns HTTP 429 with a Retry-After header when rate limits are exceeded. If your system receives 10 HTTP 429 errors within a single second, that IP address is blocked from API requests for one minute.
Implement proactive rate limit monitoring:
Monitor the X-HubSpot-RateLimit-Remaining header in API responses to track remaining requests in the current window. Implement exponential backoff when approaching limits:
async function hubspotRequestWithBackoff(requestFn, maxRetries = 3) {
  for (let attempt = 0; attempt < maxRetries; attempt++) {
    const response = await requestFn();

    if (response.status === 429) {
      const retryAfter = response.headers['retry-after'] || Math.pow(2, attempt);
      await new Promise(resolve => setTimeout(resolve, retryAfter * 1000));
      continue;
    }

    return response;
  }
  throw new Error('Max retries exceeded');
}
Batch operations reduce API consumption:
Use batch endpoints (/crm/v3/objects/contacts/batch/create) to process up to 100 contacts per request, significantly reducing API call volume.
Webflow limits
Webflow enforces 75 webhook registrations per trigger type per site. Form submission volumes are limited by your Webflow plan.
Reference HubSpot's API usage documentation and Webflow's webhook documentation for current limits.
Security and compliance considerations
HTTPS encryption: All data transmission between Webflow forms and HubSpot APIs must use HTTPS with TLS encryption.
GDPR consent fields: HubSpot provides consent field functionality for capturing explicit opt-in. Include legalConsentOptions in Forms API submissions.
Data processing agreements: Execute DPAs with HubSpot (available at https://legal.hubspot.com/dpa) and Webflow (must be requested separately through your Webflow account management). Update your privacy policy to disclose the data flow between platforms.
Troubleshoot common issues
CORS errors: See Integration architecture overview.
401 Unauthorized: Invalid or expired authentication token. Verify token is correctly stored and has not been revoked.
403 Forbidden: Token lacks required OAuth scopes. Check scope configuration in your HubSpot private app settings.
429 Too Many Requests: Rate limit exceeded. Respect the Retry-After header value and implement exponential backoff. Monitor X-HubSpot-RateLimit-Remaining headers proactively.
400 Validation errors: Invalid property values or malformed request body. Verify required fields are present and data types match HubSpot property definitions.
Reference HubSpot's error handling documentation and Webflow's form submissions management resources for detailed resolution steps.
Additional resources


