


Three integration patterns for connecting Webflow forms to Mailchimp, from native setup to full API control
Building an event registration system that captures attendee data, sends confirmation emails, and segments subscribers requires connecting Webflow forms to Mailchimp's audience management and automation features.
This guide covers architecture patterns, implementation approaches, and configuration principles for production-ready integrations.
What this integration enables
Connecting Webflow forms to Mailchimp creates a workflow where event registrations flow directly into your email marketing system with proper segmentation:
- Capturing event registration data through Webflow forms
- Adding registrants to Mailchimp audiences with custom field mapping
- Applying tags based on event type, session selection, or registration source
- Triggering automated confirmation emails and follow-up sequences
- Building dynamic segments for targeted event communications
Native Webflow-Mailchimp connectivity handles basic list building, while webhook-based implementations enable tag management and conditional routing that native integration cannot provide.
Integration architecture overview
Three architecture patterns exist for connecting Webflow forms to Mailchimp:
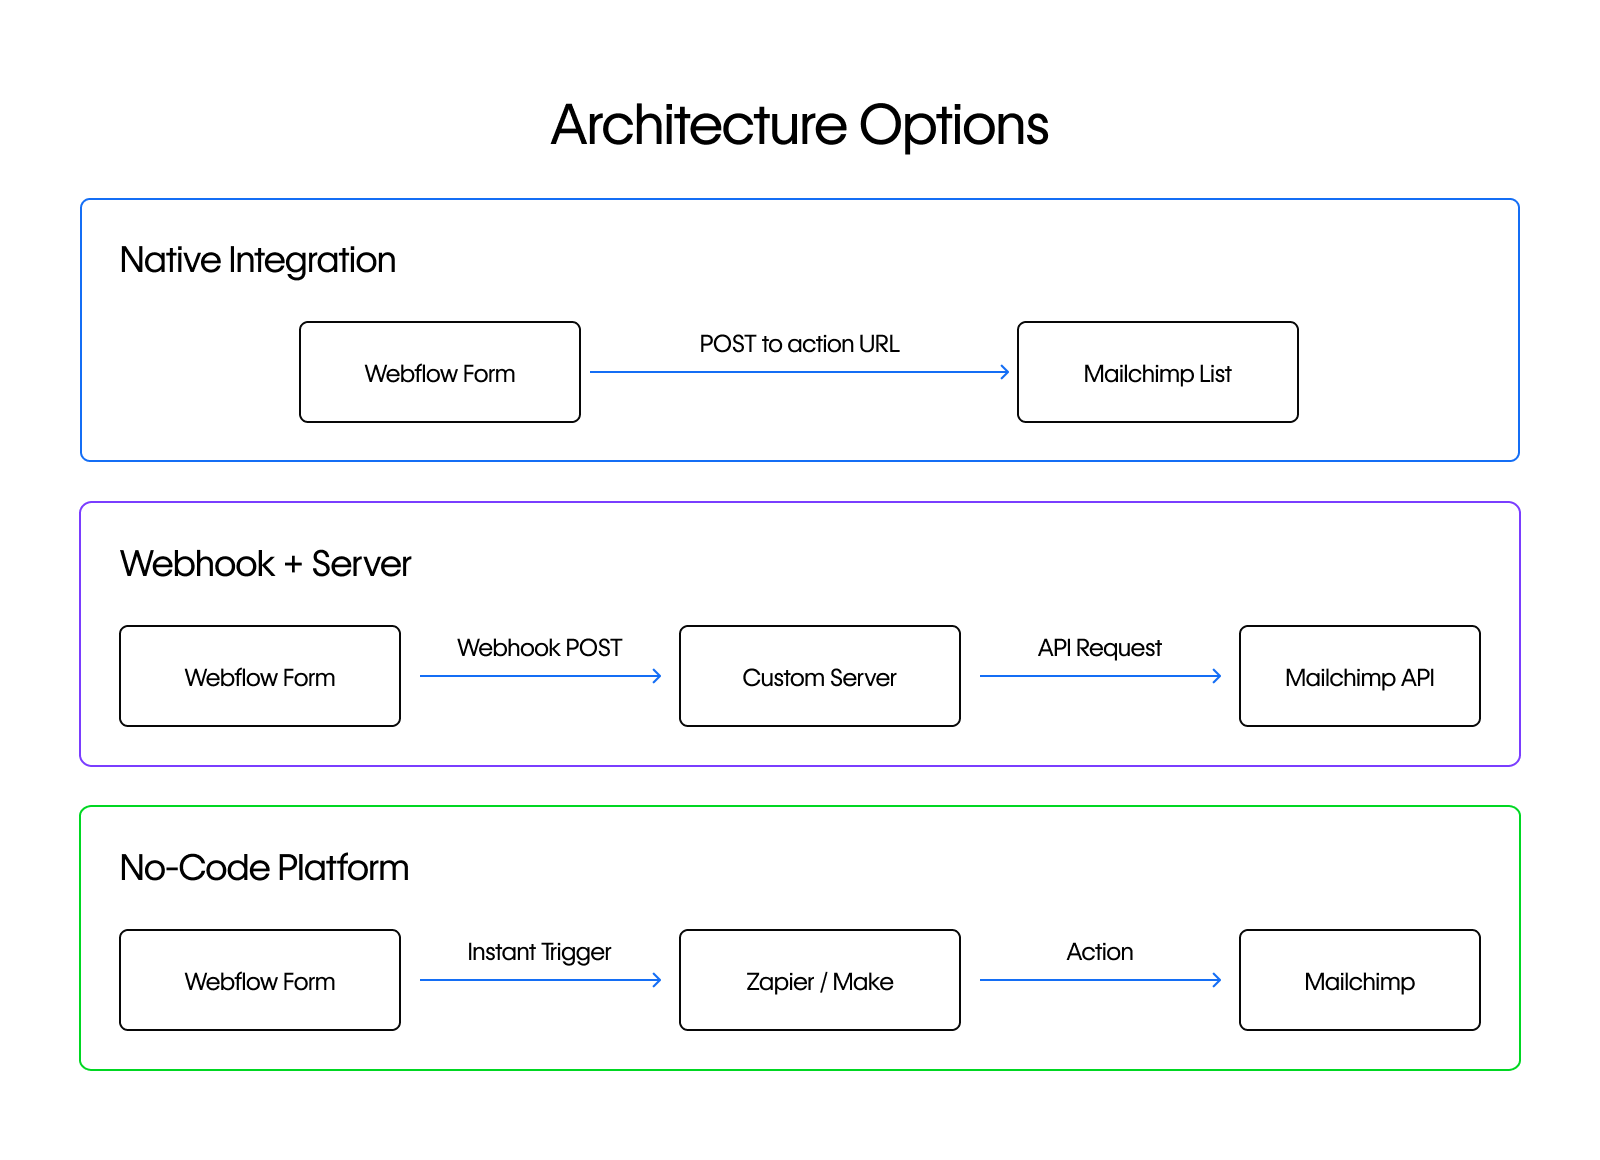
Native Integration uses Webflow's built-in form action URL. Choose this for basic list building without tags or advanced automation. This is the easiest setup with no maintenance overhead.
Webhook + Server sends form submissions to a custom endpoint that processes data and calls the Mailchimp API. Choose this when you need full control over tag application, field transformation, and conditional logic—requires server infrastructure.
No-Code Platform uses Zapier or Make as middleware. Choose this for a balance of flexibility and ease, as Zapier offers instant form submission triggers while Make provides granular control over tag operations.
Note: For event registration systems requiring attendance tracking, session tagging, or conditional routing, custom webhook integration or automation platforms are necessary.
Step 1: Configure Webflow and Mailchimp accounts
Before connecting the services, you'll configure forms in Webflow and set up audience segmentation in Mailchimp. Both platforms require specific field naming and API access setup.
Webflow requirements
- A published Webflow site with form functionality enabled
- Form fields configured with appropriate name attributes
- For webhooks: Webflow API access with
forms:readscope and an external server endpoint
Configure your Webflow form settings and review the Forms API reference.
Mailchimp requirements
- An audience (list) created for event registrants
- Merge fields configured for captured data
- Tags created for segmentation categories
- An API key from Account Settings
For automation-triggered confirmations, configure a Customer Journey with "Contact sign-up" trigger or use the Transactional API for high-priority delivery.
Review the Mailchimp Marketing API Quick Start for authentication setup.
Step 2: Set up data flow between Webflow and Mailchimp
Webflow and Mailchimp use different data structures for form submissions and subscriber records. Understanding how to transform data between these formats determines whether your integration handles field mapping, tags, and merge fields correctly.
Webflow form submission payload
When a form is submitted on your Webflow site, the webhook sends a JSON payload containing the form name, site ID, submission timestamp, and all field data. The example below shows the structure you'll receive and need to parse:
{
  "triggerType": "form_submission",
  "payload": {
    "name": "Event Registration",
    "siteId": "65427cf400e02b306eaa049c",
    "data": {
      "First Name": "Zaphod",
      "Last Name": "Beeblebrox",
      "email": "[email protected]",
      "Event Session": "Morning Workshop"
    },
    "submittedAt": "2022-09-14T12:35:16.117Z",
    "id": "6321ca84df3949bfc6752327"
  }
}
See the Form Submission Event documentation for all available fields.
Mailchimp Subscriber Data Structure
Mailchimp expects subscriber data in a specific format when adding or updating contacts via the API. The JSON structure below shows the required email_address field, the merge_fields object for custom data, and the tags array for segmentation:
{
  "email_address": "[email protected]",
  "status": "subscribed",
  "merge_fields": {
    "FNAME": "First Name",
    "LNAME": "Last Name"
  },
  "tags": ["2024-Conference", "Workshop-Attendee"]
}
See the Add or Update List Member API reference for the complete list of supported fields and status options.
Field transformation mapping
Transform Webflow submission data to Mailchimp subscriber format:
The key difference is that Webflow uses dynamic field names from Designer (case-sensitive), Mailchimp requires email_address field, custom data uses merge_fields with ALL CAPS keys, and tags require a separate API endpoint (/lists/{list_id}/members/{subscriber_hash}/tags).
Step 3: Set up the integration based on how much customization you need
Each integration method offers different trade-offs between setup complexity and feature support. Choose native integration for basic subscriber capture, webhook-based implementation for full API control, or automation platforms for a middle ground that avoids custom server infrastructure.
Method 1: Native integration implementation
Native integration works for straightforward registration where you need subscribers with standard merge fields. At a high level, you'll extract Mailchimp's form action URL from your embedded form code and configure your Webflow form's Action field to point to it.
Set your Webflow form's HTTP method to POST and name form fields using ALL CAPS merge tags exactly (EMAIL, FNAME, LNAME). This case-sensitive naming is critical for successful field mapping.
Native integration does not support: tag application, conditional routing, field transformation, or automation triggers beyond standard signup. For these capabilities, use webhook-based solutions.
Method 2: Webhook-based implementation
Webhook-based integration gives you full control over data transformation, tag application, and conditional logic. You'll set up a server endpoint to receive Webflow form submissions, validate the request signature, and make authenticated calls to the Mailchimp API.
Configure Webflow webhooks
Create webhooks via the API or through Designer by adding a destination webhook URL in form settings.
POST https://api.webflow.com/sites/{SITE_ID}/webhooks

{
  "triggerType": "form_submission",
  "url": "https://your-server.com/webflow-webhook",
  "filter": { "name": "Event Registration" }
}
See Working with Webhooks for configuration details.
Validate Webhook signatures
For OAuth applications, validate incoming requests using HMAC SHA-256 via the x-webflow-signature header:
import crypto from 'crypto';

function verifyWebflowSignature(headers, rawBody, clientSecret) {
  const signature = headers['x-webflow-signature'];
  const timestamp = headers['x-webflow-timestamp'];

  if (!signature || !timestamp) return false;

  // Reject requests older than 5 minutes
  const now = Math.floor(Date.now() / 1000);
  const requestTime = parseInt(timestamp);
  if (Math.abs(now - requestTime) > 300) return false;

  // Compute expected signature
  const hmac = crypto.createHmac('sha256', clientSecret);
  hmac.update(timestamp + rawBody);
  const expectedSignature = hmac.digest('hex');

  // Use constant-time comparison to prevent timing attacks
  return crypto.timingSafeEqual(
    Buffer.from(signature),
    Buffer.from(expectedSignature)
  );
}
Review Webhook Security for additional implementation patterns.
Add subscribers and apply tags
Once your webhook validates the incoming request, call the Mailchimp API to create the subscriber and apply tags. Adding a subscriber and applying tags requires two separate API calls:
POST https://{dc}.api.mailchimp.com/3.0/lists/{list_id}/members
Authorization: Basic base64(anystring:YOUR_API_KEY)

{
  "email_address": "[email protected]",
  "status": "subscribed",
  "merge_fields": { "FNAME": "Zaphod", "LNAME": "Beeblebrox" }
}
Apply tags via /lists/{list_id}/members/{subscriber_hash}/tags where subscriber_hash is the MD5 hash of the lowercase email. See List Member Tags API.
Server implementation
Your webhook endpoint receiving Webflow form submissions must return HTTP 200 immediately, then asynchronously process the Mailchimp API calls:
app.post('/webflow-webhook', async (req, res) => {
  res.sendStatus(200); // Respond immediately to prevent Webflow retries
  // Process Mailchimp API calls asynchronously
});
See the Webflow Examples webhook repository for complete server implementations including signature validation, field transformation, and error handling.
Method 3: Automation platform implementation
Both Zapier and Make connect Webflow form submissions to Mailchimp without custom server code. At a high level, you'll configure a trigger that fires on form submission, then add actions that create subscribers and apply tags based on form data.
Zapier configuration
Zapier's instant trigger detects Webflow submissions immediately. You'll connect a Webflow "New Form Submission" trigger to a Mailchimp "Add/Update Subscriber" action, map fields between platforms, and add tag actions for segmentation. For conditional tagging based on form responses, Zapier Paths supports up to 10 branches per decision point.
Make configuration
Make provides granular control over each step in the workflow. You'll configure a webhook trigger or use the Webflow app modules, connect to Mailchimp's "Add/Update a List Member" module for subscriber management, and add the "Add/Remove Member Tags" module for segmentation logic.
Step 4: Set up trigger confirmation emails
After registrants are added to your Mailchimp audience, you can trigger automated confirmation emails using Customer Journeys or the Transactional API. Customer Journeys work well for marketing-style confirmations triggered by tags, while the Transactional API provides higher delivery priority for time-sensitive messages.
Customer journey automations
Create automations with "Tag is added" as trigger. When a tag is applied via API, the automation initiates for that contact. Programmatically trigger specific journey steps:
POST https://{dc}.api.mailchimp.com/3.0/customer-journeys/journeys/{journey_id}/steps/{step_id}/actions/trigger

{
  "email_address": "[email protected]"
}
Transactional email alternative
For time-critical confirmations requiring guaranteed delivery, use Mailchimp's Transactional API which provides separate high-priority infrastructure.
Step 5: Build segments for event communications
Mailchimp's segmentation includes Tags (internal labels), Groups (contact-facing categories), Segments (dynamic filters), and Merge Fields (custom data). Key limits: 60 group names per audience, 100 characters per tag, five segment conditions for Free/Essentials plans.
Tags for internal tracking
Tags are invisible to contacts. Use them for registration status, attendance tracking, and automation triggers. Apply via API, import, or automation rules. See Getting Started with Tags.
Groups for self-selection
Groups are contact-facing with a two-level architecture (categories containing names). Maximum 60 group names per audience. Reserve for registrant-controlled preferences. See Getting Started with Groups.
Segments for dynamic filtering
Segments combine tags, groups, and merge fields for auto-updating subscriber lists. Example: "All tagged '2024-Conference' AND in group 'Session-A' AND opened last campaign." See Getting Started with Segments.
Step 6: Test and verify form data flow
Confirming successful integration requires validating data at each step of the pipeline—from form submission to audience segmentation.
Submit test registrations and verify:
- Webflow form submissions appear in Forms dashboard
- Webhook deliveries show in server logs
- Subscribers appear in Mailchimp with correct merge fields and tags
For webhook debugging, verify your endpoint returns HTTP 200 immediately. Non-200 responses trigger retries before webhook deactivation.
Development vs. production
Use Webflow's X-Trigger-Error header during development to test error handling scenarios without affecting real data. Consider creating a separate Mailchimp test audience to isolate development submissions from production contacts. See the Mailchimp API Errors documentation for testing error responses.
Monitor API responses
Common Mailchimp status codes:
- 400: Invalid parameters
- 401: Invalid/missing API key
- 429: Rate limit exceeded (implement backoff)
- 404: List ID not found
Check Webflow Status and Mailchimp Status before troubleshooting.
Manage API rate limits and error handling
Both platforms enforce request limits that require careful handling in production.
Mailchimp enforces a 10 concurrent connection limit per user. Implement exponential backoff for 429 responses:
async function mailchimpRequestWithRetry(requestFn, maxRetries = 3) {
  for (let attempt = 0; attempt < maxRetries; attempt++) {
    try {
      return await requestFn();
    } catch (error) {
      if (error.response?.status === 429 && attempt < maxRetries - 1) {
        await new Promise(resolve => setTimeout(resolve, Math.pow(2, attempt) * 1000));
        continue;
      }
      throw error;
    }
  }
}
Webflow allows 75 webhook registrations per trigger type.
Technical constraints
Keep these platform-specific limits in mind when architecting your integration.
- Webflow: 75 webhooks per trigger type
- Mailchimp: 10 concurrent connections per user, TLS 1.2+ required, access tokens never expire
- Security: Store credentials in environment variables only, never expose API keys client-side, validate webhook signatures using HMAC SHA-256
For additional details, see Webflow Developers documentation and Mailchimp Marketing API reference.


